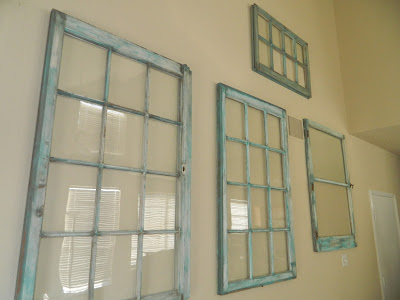
What you might not know is that I love antique windows.
I love antique windows...oh, I said that already. I guess you could say I collect them. I especially love when they still have old hardware on them.
 |
| This window is from my friend's old farmhouse in Colorado~ |
By now you probably know that I really enjoy a bargain. Out of all the windows I have, I've only paid for two...$2 for a 12 pane antique window at a garage sale in our little town of Media in PA...I bought the two they had :) Some of my windows are from my friend's old farmhouse in Colorado...she replaced some windows and I happily took 4 of her old ones.
I acquired all the others by "dumpster diving"...well, I didn't actually go into any dumpsters, but I did take them out of folks garbage. Seriously, people just put these beauties out on the curb to be picked up with their garbage. It got to the point that if the girls noticed a window (or something else they thought I might be interested in) they would make sure to point it out...I'm training them well ;)
We packed up those windows and moved them to Texas with us. Houses here in Frisco are generally newer (and larger, for that matter) and with that comes taller ceilings and more wall space. We have a large, tall wall in the family room and every picture I put on it looked like a postage stamp on an envelope because of it's dimensions. I tried a bookcase and it looked miniature. What to do, what to do?
And then I realized I had a place to display at least some of my windows!
I would love to paint the wall, but getting up on ladders or scaffolding is not an option and hiring a painter is not in the budget right now. I needed to bring in some color, so I decided to paint the windows turquoise...a favorite color of mine. I considered using that awesome chalk paint, but decided it was too expensive for the amount of paint I actually needed for this project.
So, once again, I turned to good old craft paint. I bought a bunch of different shades of blue, green, and turquoise...and some gray to add to the mix. I squirted the colors onto a paper plate and, with my help, I let the big girls mix colors and paint the windows. I followed behind them with a cheap craft sponge "brush" to spread and rub off the paint.
 |
| Just the beginning~ |
 |
| I love turquoise!!! |
The hardest part was determining how to arrange them and then getting them up on the wall. I made a diagram of the wall and little moveable paper windows and the girls and I moved them around until we found a layout we liked. Once again, my hot handyman worked hard getting those windows up on the wall. Those nice little air ducts made for some spacing challenges.
Here's a huge shout out to Steve for very patiently working hard to get our beautiful windows hung.
 |
| My hot handyman~ |
And here's the final look. I also put one on the mantel :)
 |
| Wall of windows~ |
 |
| I LOVE this big brick fireplace! |
Rach


Neato! Which ones are mine? HA! Don"t think I didn't notice :). They look great!
ReplyDelete