I would say that I like decorating, but I'm not able to put a lot of time or money into doing it all up. Way back when we used to have satellite TV, I enjoyed HGTV and all their decorating shows. I really liked the ones that turned junk and discards into decorating ideas and I always enjoy a bargain :)
I haven't watched a decorating show in years...our family's split from TV programming is fodder for another blog.
Anyway, back to making this house our home.
Steve and I generally have similar decorating tastes and lucky for me, I married a Gonzales. I LOVE bright and warm colors and design with Spanish and Southwestern influence. I also love antiques and really enjoy using antique elements in decorating. Throw in a little shabby chic and sometimes a bit of bohemian and eclectic design...that's what you'll find in our home.
So, when I turned to Pinterest and saw folks making curtains out of drop cloths, I knew I had found how I wanted to make our new curtains...light and airy, casual, easy, and very affordable.
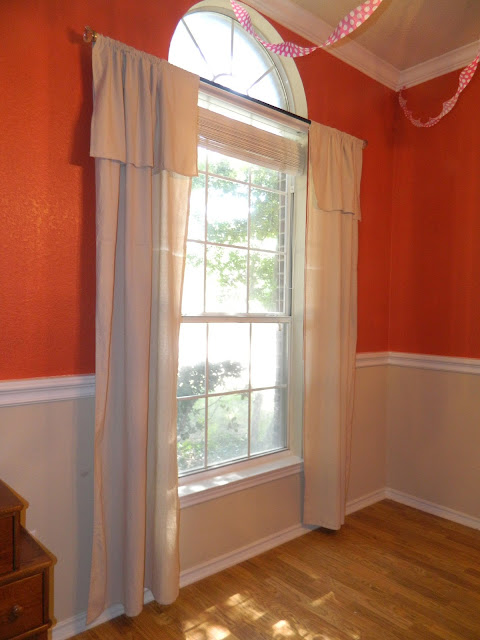
So far, I've only made curtains for the dining room...here's the finished product.
 |
| Drop cloth turned curtains~ |
Here's how we did it. I was in charge of design, Steve handled all the assembly :)
For this window, I used a 9' by 6' canvas dropcloth I bought at Lowes.
First, I washed it and then I cut it in half. Word of warning, these dropcloths shrink and don't stay all nice and square. If your design requires more precision, this might not be the best way for you to go.
I measured the best I could knowing I had enough fabric to make an extra layer at the top. Then I sewed a hem and a space for the rod to slide through.
And now on to the rod...which I'm super pleased with :) The rod is a piece of electrical conduit...seriously, electrical conduit I bought at Home Depot. And as an added bonus, it was already the length I needed...although this stuff is easy to cut if you need to. I painted it black with some craft paint.
Then Steve added the antique doorknobs as the curtain rod finials! I bought a bunch of these doorknobs off Ebay for less than $10 a set (that includes the shipping too)...I can't remember my exact price.
Steve cut the metal bar that holds the knobs together and fit them into a square wooden dowel he drilled out. Then he shaved the corners off the dowel and fit them into the ends of the electrical conduit.
 |
| The rod in progress~ |
I also bought some super affordable molding to cover the front of our wooden blinds because for some reason the person who owned the house before us took them off and left us with this ugliness. We cut it to length and attached with velcro...problem fixed :)
 |
| Thanks for taking all the blind facings and wands...tacky~ |
Dropcloth...$11
Electrical Conduit...$1.75
Craft Paint...I already had a bottle, but you can get it at a craft store for a dollar or two
Glass Antique Doorknobs...lets just say $10 a set even though my cost was less
Curtain Hardware for hanging the rod...$4
Wooden Dowel...I don't remember, but I'm pretty sure it was less than $2 and Steve only used a little bit, so we have plenty for more curtain projects.
Molding...I bought the super cheap stuff for this "cover up"...it cost less than $2
So, for less than $30, I was able to get this look...not bad :)
 |
| The finished product...streamers courtesy of Bella's birthday :) |
I'm excited to begin on the family room curtains :)
Blessings~
Rach


No comments:
Post a Comment