~a glimpse of life...a bit of this...a bit of that~

Saturday, August 31, 2013

Making it Ours...Drop Cloth Curtains

We are slowly getting settled into our new home and slowly adding the touches that make a house feel like home.  

I would say that I like decorating, but I'm not able to put a lot of time or money into doing it all up.  Way back when we used to have satellite TV, I enjoyed HGTV and all their decorating shows.  I really liked the ones that turned junk and discards into decorating ideas and I always enjoy a bargain :)

I haven't watched a decorating show in years...our family's split from TV programming is fodder for another blog.

Anyway, back to making this house our home.  

Steve and I generally have similar decorating tastes and lucky for me, I married a Gonzales.  I LOVE bright and warm colors and design with Spanish and Southwestern influence.  I also love antiques and really enjoy using antique elements in decorating.  Throw in a little shabby chic and sometimes a bit of bohemian and eclectic design...that's what you'll find in our home. 

So, when I turned to Pinterest and saw folks making curtains out of drop cloths, I knew I had found how I wanted to make our new curtains...light and airy, casual, easy, and very affordable.  

So far, I've only made curtains for the dining room...here's the finished product.

Drop cloth turned curtains~

I'm not a great seamstress...if I can make these, so can you~

Here's how we did it.  I was in charge of design, Steve handled all the assembly :)

For this window, I used a 9' by 6' canvas dropcloth I bought at Lowes.

First, I washed it and then I cut it in half.  Word of warning, these dropcloths shrink and don't stay all nice and square.  If your design requires more precision, this might not be the best way for you to go.

I measured the best I could knowing I had enough fabric to make an extra layer at the top.  Then I sewed a hem and a space for the rod to slide through.  

And now on to the rod...which I'm super pleased with :)  The rod is a piece of electrical conduit...seriously, electrical conduit I bought at Home Depot.  And as an added bonus, it was already the length I needed...although this stuff is easy to cut if you need to.  I painted it black with some craft paint.  

Then Steve added the antique doorknobs as the curtain rod finials!  I bought a bunch of these doorknobs off Ebay for less than $10 a set (that includes the shipping too)...I can't remember my exact price.  


Steve cut the metal bar that holds the knobs together and fit them into a  square wooden dowel he drilled out.  Then he shaved the corners off the dowel and fit them into the ends of the electrical conduit.


The rod in progress~

And, voila...a curtain rod with real glass antique doorknob finials and "linen" curtains on the cheap!!!


I also bought some super affordable molding to cover the front of our wooden blinds because for some reason the person who owned the house before us took them off and left us with this ugliness.  We cut it to length and attached with velcro...problem fixed :)

Thanks for taking all the blind facings and wands...tacky~
The not-quite-exact cost breakdown of our project...our actual cost is probably less than these estimated numbers:

Dropcloth...$11 
Electrical Conduit...$1.75
Craft Paint...I already had a bottle, but you can get it at a craft store for a dollar or two
Glass Antique Doorknobs...lets just say $10 a set even though my cost was less
Curtain Hardware for hanging the rod...$4
Wooden Dowel...I don't remember, but I'm pretty sure it was less than $2 and Steve only  used a little bit, so we have plenty for more curtain projects.
Molding...I bought the super cheap stuff for this "cover up"...it cost less than $2

So, for less than $30, I was able to get this look...not bad :) 
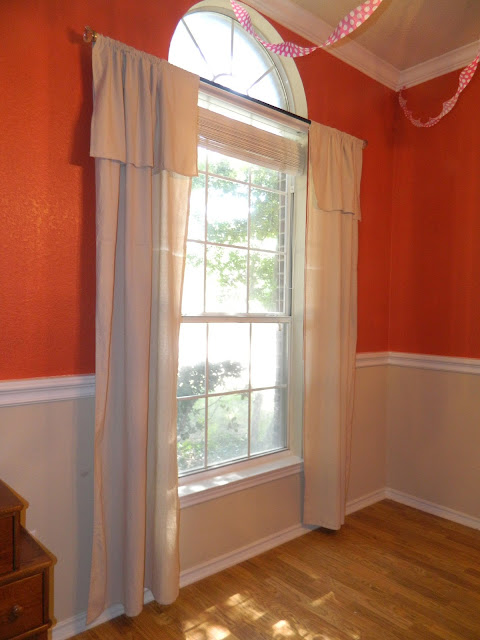
The finished product...streamers courtesy of Bella's birthday :)

I'm excited to begin on the family room curtains :)


Blessings~
Rach


Thursday, August 15, 2013

What a CHORE...

I have not done a good job of training my kids to be helpers with chores around the house.  

There it is...the confession...

I don't really know why.  Probably because it was usually just easier to do it myself...especially when they were younger and 'helping' Mommy often created even more mess for me to deal with.  And I'm sure some of it was simply because I didn't appreciate their desire to be my helpers the way I wish I had.  And because I just got into the habit of doing most of it myself...a bad habit.  

Don't misunderstand, they do have some chores, but I just haven't done a good job of continuing to teach and train them.  

We've done sticker charts and other types of supposed-to-be-motivational charts, but nothing has seemed to work for the long term.  Honestly, a lot of the problem has been my follow through and keeping up with the stickers and/or rewards.

But moving made me realize it was time to get a handle on this and so we began working on more chores and training for the girls.  And they have been doing a great job and, even though they sometimes grumble about chores, they are great helpers.  

We began a "chore chart" of sorts when we were in the rental.  It worked for a while, but fell to the wayside when we packed up to move again.  

But now that we are in our (hopefully) permanent home, I decided it was time to get serious about a chore chart and the girls earning some commission.  

I turned to friends, Pinterest, and the internet for ideas.  I knew I wanted something that would satisfy their desire to see a job finished.  I knew I wanted something we could add to (or take away from) if necessary.  And I knew I was done with sticker charts or check marks and a list on the wall.  I wanted something that would inspire them and inspire me to keep up with it.  I pieced together bits of this and that to come up with this.  


Chore chart in action~

Here's how it works.  The girls have cards that hang on two hooks...one for daily tasks and one for weekly/monthly tasks.  When they complete a task they move the card to the far right hook.  At the end of the day, Steve or I review their cards and they get chips added to their jar and the cards get put back on their starting hook.  We hung each "chart" by their bedroom doors so we can remember to do the chips daily...usually right before we tuck them in at night.  

Some tasks (like Morning Routine and Bedtime Routine) don't earn very much...you have to do both to get just one chip.  I made those cards mostly as reminders so I could stop reminding them all the time of what exactly we expect when we ask them to get ready for the day or to get ready for bed.  Other cards (like caring for the cats) earn one chip and others (like Cleaning Baseboards) get two or maybe even more chips.  And I have a few for me to add if I want to give extra notice or encouragement to them...like Thanks for Being Kind.  The chips add up and at the end of the month it's payday.  

I'm cheap...our chips are only worth a nickel each.  I don't want my girls to "expect" to be paid for being part of our family and helping out, but I also totally recognize that sometimes it's really great to have some extra motivation and to earn a bit of money.   Even nickels add up :)

The girls really get a kick out of moving their cards from one hook to the other.  Isabella asked me if she could dust the other day...she asked to dust...so blessed!

Here's how we made them.

Steve cut the wood from old bed slats we have in the garage.  I let the girls paint them a color of their choice and decorate them with stickers.  Steve added the hooks and an electrical clamp to hold the jar.  Old bed slats and baby food jars...how's that for recycling/upcycling? :)  

And can I just say that I think these cards are cute!  They are my favorite part of the upcycleness of this project.  Upcycleness?  Upcycletivity?  

Anyhoo...

She's crafty~

Do you remember that movie, "Akeelah and the Bee"?  Whoa, where's this going, you may be wondering.  Well, Starbucks did a promotion along with that movie and had coasters and table top vocabulary flash cards in their stores.  


When the promo was over, I asked my local Starbucks if I could have their leftover cards...I got a shoebox full of these little chipboard gems.  To make our chore cards, I simply added a cutely decorated chore to one side and left the vocabulary card on the back!  So, our girls are also learning vocabulary words...I'm a dork about stuff like this, but I am seriously giddy over this added little chore chart bonus ;)  

I guess you could say that these charts are proving to be eudaemonic in our home :)

Here's your vocabulary word for the day~

Many blessings~
Rach